
Intro
I recently decided to pick up a broken iRobot Roomba S9 on eBay to repair and experiment with (look for my Roomba S9 "Error 31" repair tutorial in the future). Once I got mine working, the first thing I wanted to do was fully integrate it into my Home Assistant environment. For the basics this was straightforward, with the iRobot integration, but it was non-trivial and took some experimenting to get the other features I wanted like being able to execute individual room/zone cleaning or queue up multiple rooms/zones. Since I could not find anyone else who had done something like this, I decided to document the process here for others looking to do the same or similar.
In this tutorial, we'll go over:
- Installing and configuring the iRobot integration in Home Assistant.
- Creating a simple Lovelace card for the Roomba.
- Intercepting and sending custom commands to the Roomba.
- Creating a Python script to send multiple regions to be cleaned by the Roomba in the order selected.
Install and Configure the iRobot Integration
First, we are going to start by installing the iRobot integration in Home Assistant. I was unable to get the automatic configuration to work and had to manually fetch the credentials for my robot. I'll go over those manual steps in detail.
Install Integration
To begin, install the integration below:
 Home Assistant
Once installed, the configuration should start. Try the automatic configuration but it did not work for me. If that is the case with your instance too, see the next steps to complete manually.
Install Dorita980 On Linux
On a Linux terminal (I am using Ubuntu) install Dorita980 via NPN.
 koalazak
This is an unofficial OpenSource SDK for iRobot Roomba and Braava platforms which allows for direct LAN control of the robots. All the things I love to see! It can be installed with the following command:
sudo npm install -g dorita980Get the Credentials for Manual Setup
To get the required credentials for the integration's manual setup (BLID & Password), run the following command with your iRobot account credentials used on the iRobot app:
get-roomba-password-cloud <iRobot_email> "<iRobot_pass>"You should see the following output with your Roomba(s) information:
Found 1 robot(s)!
Robot "Vladimir" (sku: s955020 SoftwareVer: soho+3.20.7+soho-release-rt421+11):
BLID=> xxxxxxxxxxxxx
Password=> :1:1486937829:gktkDoYpWaDxCfGh <= Yes, all this string.

Use this credentials in dorita980 lib :)
Add your Robot to the Integration
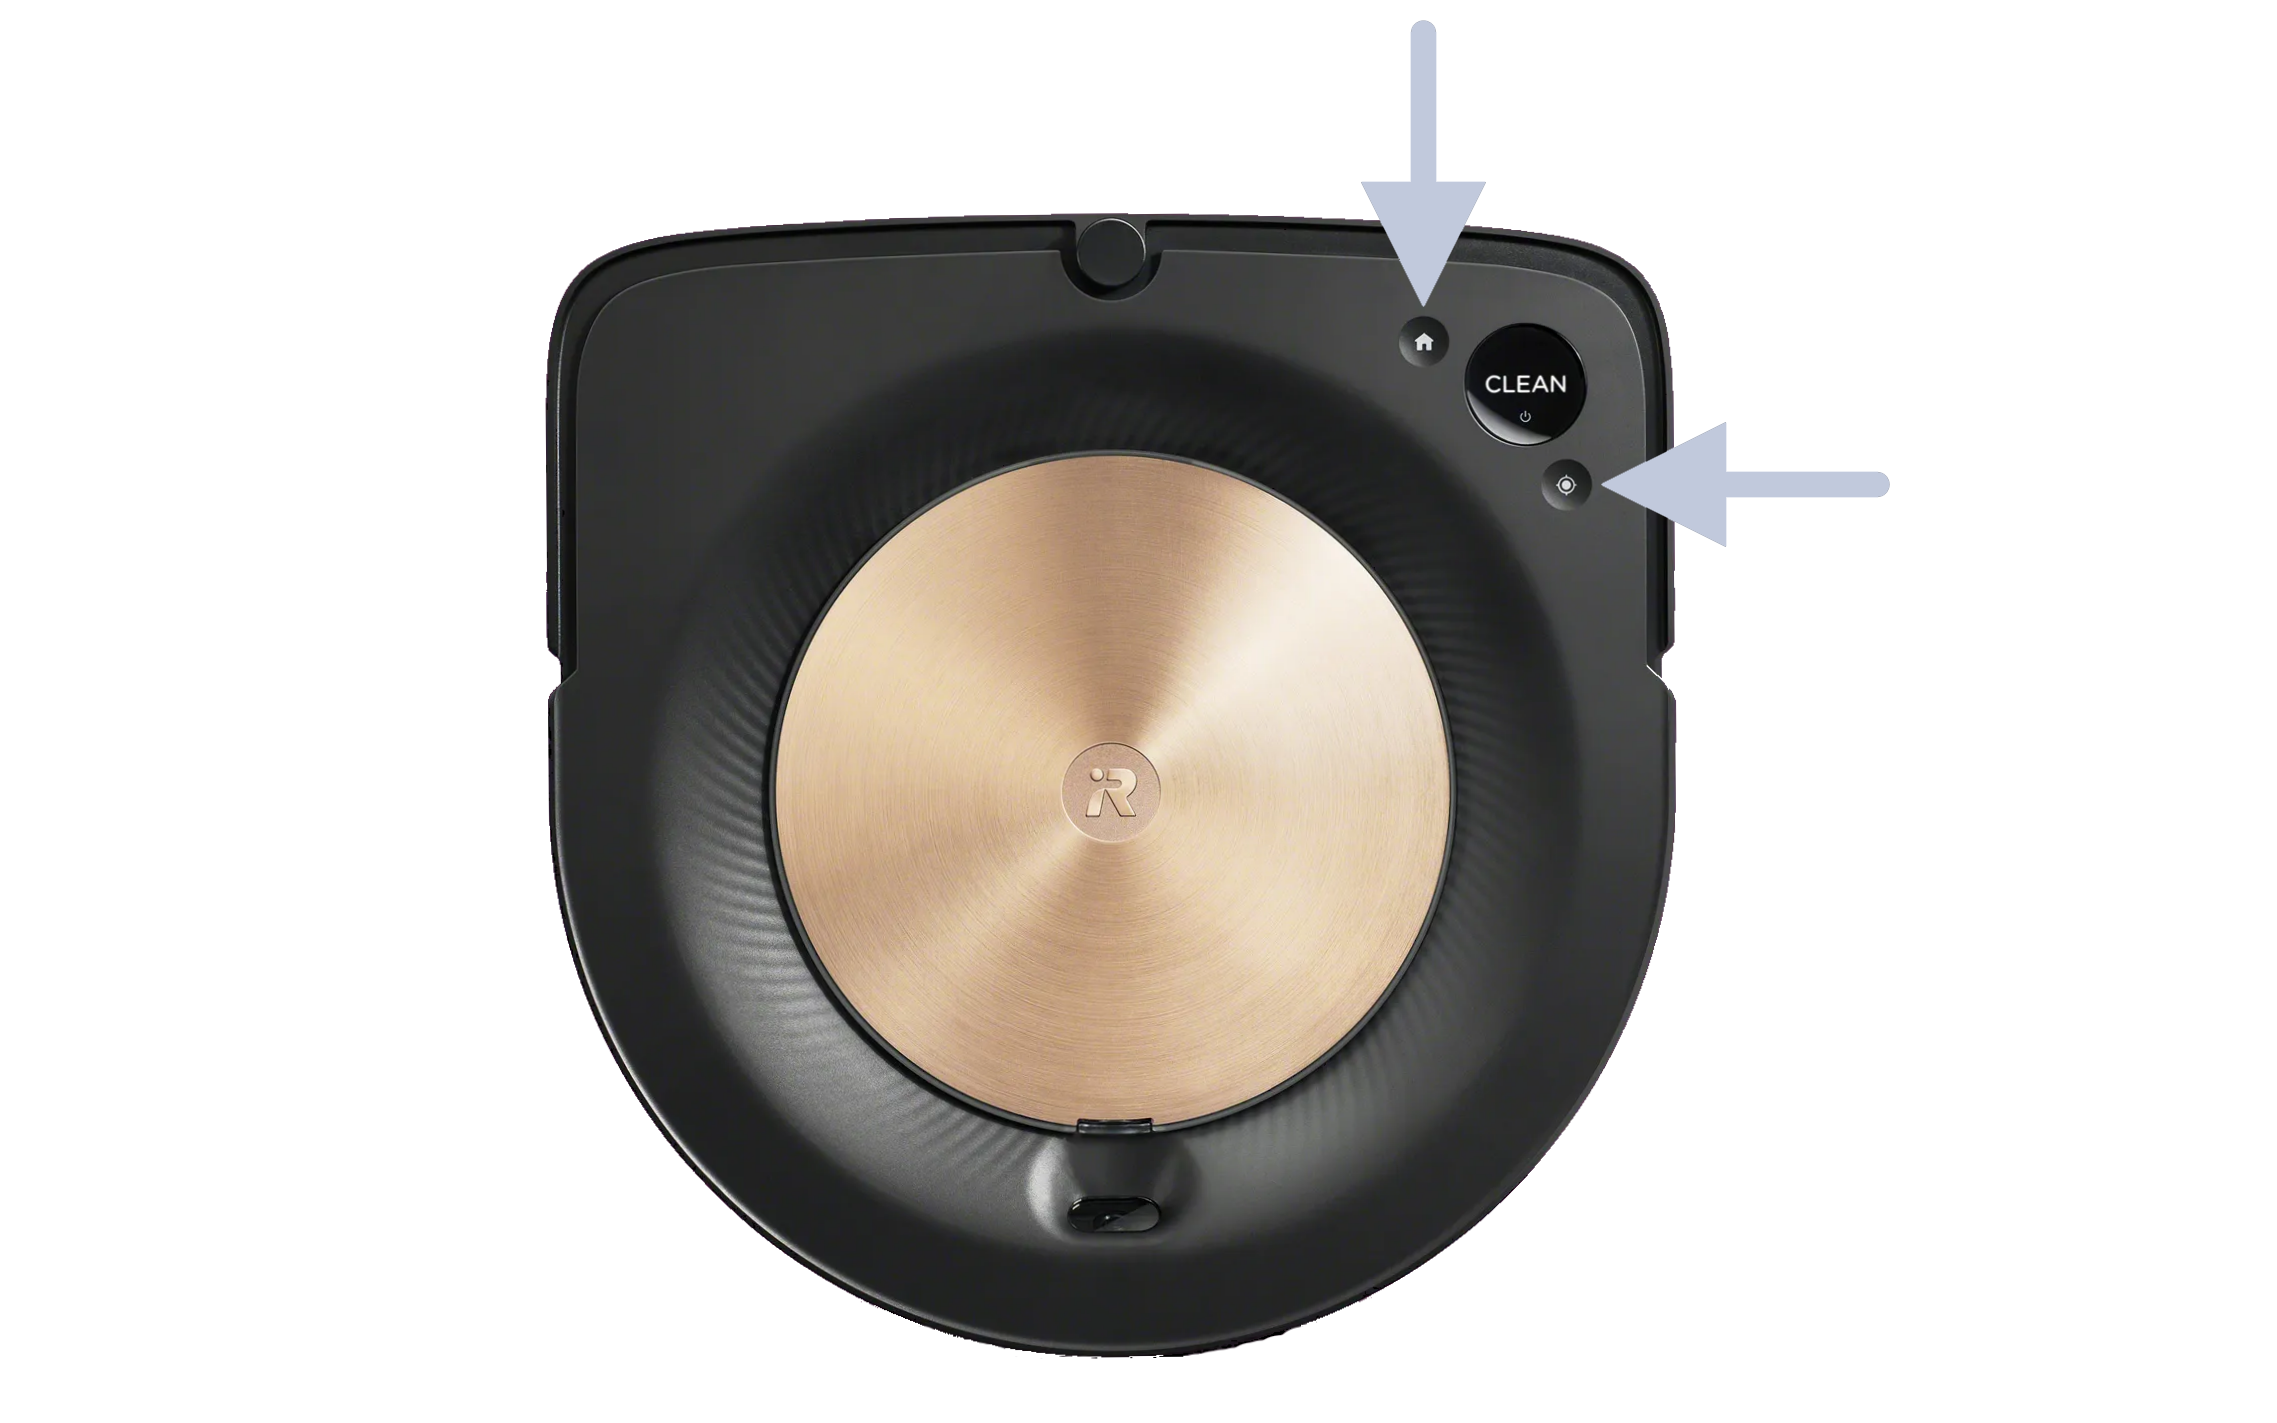
Using the credentials from the previous step, enter them into the integration's configuration manual input. Before clicking submit, you need to put your robot into "connection" mode. To do so, on the S9 platform, hold both the Home and the Spot Clean buttons at the same time until it makes a chime sound and the light ring turns blue (about 2 seconds).
Click submit on your credentials for the iRobot integration in Home Assistant and give it a few seconds to connect. It should connect and add the Roomba as a new device to your Home Assistant.
Create a Basic Vacuum Card
Unfortunately, there is no compatible default Lovelace card for the Roomba device. A simple and fast solution is to add the "more info card" to Home Assistant and use that to display the more info controls for the Roomba. Add the following custom card to your Home Assistant.
thomaslovenMake a new card on your Lovelace dashboard with your Roomba device and you should have a card as shown below.

Test out the basic functionality (Play, Pause, Stop, Locate, and Return Home) to verify your integration is working correctly before moving on.
Add Controls For Specific Room & Zone Cleaning
In this section, we will add controls to Home Assistant for telling the Roomba to clean specific rooms/zones. Before starting this section, make sure your Roomba has done at least one mapping run and you have defined the rooms/zones for your map.
From what I can tell, the Roomba stores the map locally on the onboard computer. Each room is given a unique numeric ID under the type "rid" and each zone is given a unique numeric ID under the type "zid". These IDs are not exposed on the Roomba app so we'll have to "intercept" them using the Dorita980 SDK.
The easiest way I found to get this information is to spin up a docker container with dorita980, fetch the latest command information that was sent to the Roomba, and print that information before exiting. The order of operation is important here, and both the Home Assistant integration and the iRobot app must not be connected to the Roomba for the information to be acquired.
Perform the following steps in this order to acquire a room or zone ID:
- Navigate to the integration in Home Assistant -> Configure and uncheck Continuous. This will stop the integration from connecting to the Roomba.
- Open the iRobot app on your phone, send the Roomba to clean a specific room or zone then close the app so it disconnects from the Roomba.
- Run the following command in your Linux terminal (note you must have docker installed before running):
sudo docker run -e BLID='<BLID>' -e PASSWORD='<PW>' -e ROBOT_IP='<IP>' -it -w /root node sh -c "npm install --silent --no-progress dorita980 && node -e \"var dorita980 = require('dorita980'); var robot = new dorita980.Local(process.env.BLID, process.env.PASSWORD, process.env.ROBOT_IP); robot.getRobotState(['lastCommand']).then((st)=> { console.log(st.lastCommand); process.exit(0); });\""The output for a single room command:
{
  command: 'start',
  initiator: 'rmtApp',
  time: 1234567890,
  ordered: 1,
  pmap_id: 'F-WxTMqjAUNS33miqwswg',
  regions: [ { region_id: '12', type: 'rid' } ],
  user_pmapv_id: '143158F08305'
}
The output for a double room command:
{
  command: 'start',
  initiator: 'rmtApp',
  time: 1641184321,
  ordered: 1,
  pmap_id: 'C-5UxHWxTMqjAUNS33miqw',
  regions: [ { region_id: '1', type: 'rid' }, { region_id: '10', type: 'rid' } ],
  user_pmapv_id: '220102T080204'
}
As you can see, there are a few pieces of information sent to the Roomba to initiate a room/zone cleaning. The critical pieces here are ordered, pmap_id, and regions. However, only the region fields will change for each room/zone.
Repeat this process for each room/zone matching the name to the ID and type. You can also select all rooms/zones in the iRobot app and note the order. They will appear in the regions list in that order.
Adding a Clean Room Button to Lovelace
Now that we know the command being sent to the Roomba to clean specific rooms/zones, we can make buttons for it in Lovelace. Use the template below to create a button:
type: button
tap_action:
  action: call-service
  service: vacuum.send_command
  service_data:
    entity_id: vacuum.<roomba_name>
    command: start
    params:
      pmap_id: <pmap_id>
      regions:
        - region_id: '<region_id>'
          type: <zid or rid>
name: Clean <room_name>
icon: <icon>You can repeat this to make a button for each room/zone you have. However, this does not allow for queuing of rooms/zones like in the official app and makes it a bit of a pain to use. Boo!
Room/Zone Queuing With Python
To get around this, we need to format multiple regions together like we saw in the double room command. The best solution for this is to use Python in Home Assistant to read some booleans (and their timestamps) and then format and send the command with required and sorted regions to the Roomba.
HomeAssistant Python Scripts
See the following documentation on quickly getting Python Scripts setup in Home Assistant. I highly recommend following their example and getting your logger setup to show info-level events before continuing.
Here's the TL;DR; of what you need for the Python Scripts and Logger configuration:
# Python Scripts Enable:
python_script:
# Logger:
logger:
default: infoAnd more info and examples here:
Home AssistantSetup Booleans and Buttons for Your Rooms/Zones
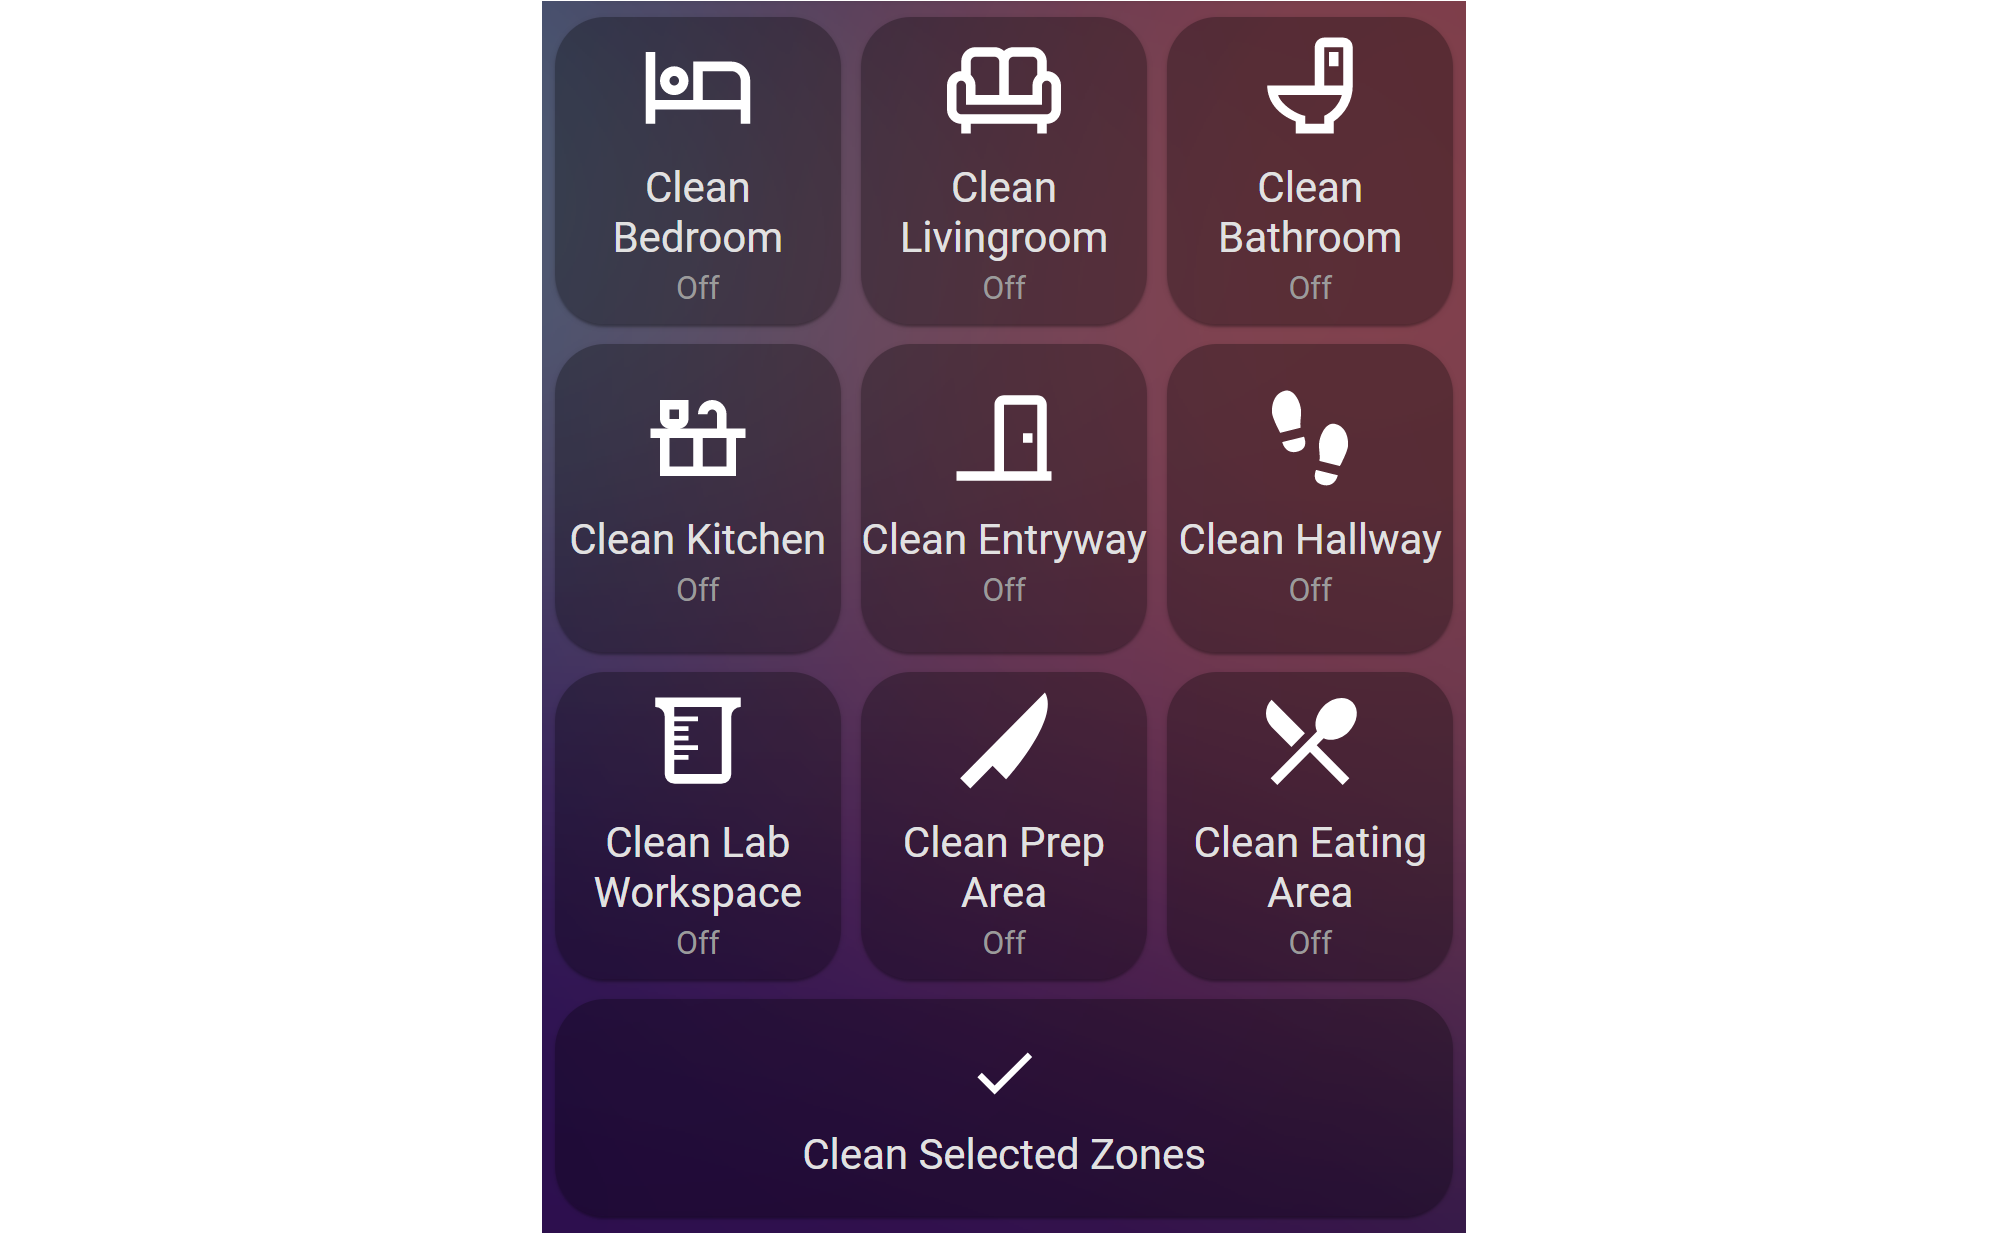
Setup a Boolean for each room/zone and corresponding buttons to toggle them. Think of these buttons as checkboxes, this is how the room/zones will be selected and queued before sending to the Roomba.
# Booleans:
input_boolean:
  # Roomba Room Booleans:
  clean_bedroom
clean_livingroomtype: grid
cards:
- type: button
tap_action:
action: toggle
name: Clean Bedroom
icon: mdi:bed-outline
entity: input_boolean.clean_bedroom
show_state: true
- type: button
tap_action:
action: toggle
name: Clean Livingroom
icon: mdi:sofa-outline
entity: input_boolean.clean_livingroom
show_state: trueNext, we need to create a Python script to:
- Read the states of the Booleans for each room/zone.
- Sort them in order of selection based on their last_updated field (timestamp).
- Pack regions into a list and format with the rest of the command structure.
- Send the command to the Roomba.
- Set Booleans back to off (false).
############################
#   name: clean_rooms.py   #
#   author: Joshua Hess    #
############################

# Dict of region ID's and RID's
regions = {
    'kitchen': {'region_id': '1', 'type': 'rid'},
    'bathroom': {'region_id': '12', 'type': 'rid'},
    'bedroom': {'region_id': '13', 'type': 'rid'},
    'livingroom': {'region_id': '14', 'type': 'rid'},
    'hallway': {'region_id': '2', 'type': 'rid'},
    'lab': {'region_id': '15', 'type': 'rid'},
    'entryway': {'region_id': '10', 'type': 'rid'},
    'eating_area': {'region_id': '1', 'type': 'zid'},
    'prep_area': {'region_id': '0', 'type': 'zid'}
}

# Lists for Selections and Region Data
selection_list = []
regions_list = []

# Add Boolean State Objects to Selection List if True
if hass.states.get('input_boolean.clean_kitchen').state == 'on':
    selection_list.append(hass.states.get('input_boolean.clean_kitchen'))
if hass.states.get('input_boolean.clean_bathroom').state == 'on':
    selection_list.append(hass.states.get('input_boolean.clean_bathroom'))
if hass.states.get('input_boolean.clean_bedroom').state == 'on':
    selection_list.append(hass.states.get('input_boolean.clean_bedroom'))
if hass.states.get('input_boolean.clean_livingroom').state == 'on':
    selection_list.append(hass.states.get('input_boolean.clean_livingroom'))
if hass.states.get('input_boolean.clean_hallway').state == 'on':
    selection_list.append(hass.states.get('input_boolean.clean_hallway'))
if hass.states.get('input_boolean.clean_lab').state == 'on':
    selection_list.append(hass.states.get('input_boolean.clean_lab'))
if hass.states.get('input_boolean.clean_entryway').state == 'on':
    selection_list.append(hass.states.get('input_boolean.clean_entryway'))
if hass.states.get('input_boolean.clean_eating_area').state == 'on':
    selection_list.append(hass.states.get('input_boolean.clean_eating_area'))
if hass.states.get('input_boolean.clean_prep_area').state == 'on':
    selection_list.append(hass.states.get('input_boolean.clean_prep_area'))

# Sort Selections by Timestamp (In Order of Selection)
selection_list.sort(key=lambda x:x.last_updated)

# Pack Region Data into Region List in Sorted Order
for selection in selection_list:
    # Hard coded check for boolean states and append regsion list
    if selection == hass.states.get('input_boolean.clean_kitchen'):
        regions_list.append(regions['kitchen'])
    if selection == hass.states.get('input_boolean.clean_bathroom'):
        regions_list.append(regions['bathroom'])
    if selection == hass.states.get('input_boolean.clean_bedroom'):
        regions_list.append(regions['bedroom'])
    if selection == hass.states.get('input_boolean.clean_livingroom'):
        regions_list.append(regions['livingroom'])
    if selection == hass.states.get('input_boolean.clean_hallway'):
        regions_list.append(regions['hallway'])
    if selection == hass.states.get('input_boolean.clean_lab'):
        regions_list.append(regions['lab'])
    if selection == hass.states.get('input_boolean.clean_entryway'):
        regions_list.append(regions['entryway'])
    if selection == hass.states.get('input_boolean.clean_eating_area'):
        regions_list.append(regions['eating_area'])
    if selection == hass.states.get('input_boolean.clean_prep_area'):
        regions_list.append(regions['prep_area'])

# Clear all boolean states to false
hass.states.set('input_boolean.clean_kitchen', 'off', '')
hass.states.set('input_boolean.clean_bathroom', 'off', '')
hass.states.set('input_boolean.clean_bedroom', 'off', '')
hass.states.set('input_boolean.clean_livingroom', 'off', '')
hass.states.set('input_boolean.clean_hallway', 'off', '')
hass.states.set('input_boolean.clean_lab', 'off', '')
hass.states.set('input_boolean.clean_entryway', 'off', '')
hass.states.set('input_boolean.clean_eating_area', 'off', '')
hass.states.set('input_boolean.clean_prep_area', 'off', '')

# Pack Data to Send
service_data = {
    'entity_id': 'vacuum.vladimir',
    'command': 'start',
    'params': {
        'pmap_id': '<pmap_id>',
        'regions': regions_list,
        'ordered': 1,
    }
}

# Send Data to Roomba
hass.services.call('vacuum', 'send_command', service_data, False)
Replace your regions, Booleans, and other command data in the above script and test. If it is working correctly, you should be able to set each of your room or zone booleans to queue the rooms/zones to be cleaned. Then, execute the Python script and the Roomba should clean the selected rooms/zones in the order that they were selected. Pretty neat!
The final step is to add a button to your Lovelace that executes the Python script. Follow the template below:
type: button
tap_action:
  action: call-service
  service: python_script.clean_rooms
  service_data: {}
  target: {}
icon_height: 30px
icon: mdi:check
name: Clean Selected ZonesPut that all together and you should have something that looks like this:
Final Thoughts
I am pleased with how this solution has been working for me. I have used this for a few weeks now without any issue. The Python script could be simplified a bit with some thought and for loops but I did not bother since I will not need to add or remove zones frequently if ever. It would also be a good idea to consider using the secrets.yaml to store some of the Roomba credentials used in the script for good form.
A similar Python script could be used for automation. For example, if you wanted to clean specific rooms in a specific order when certain people leave the house. You can also use the methods described here to add any Roomba functionality into Home Assistant. For example, if you wanted a mapping run button, simply repeat the steps to "intercept" the command, then follow the same basic button template to add a button to Lovelace.
I hope this was useful and saves some time for those looking to integrate this functionality of their Roomba into their Home Assistant.